Last week, I have drew six plan of composition of my film campaign design. I am going to choose 2 of the design and create it using Adobe Photoshop. All the pictures will be a stock images and not originally from myself. I will show every process and decisions I made in here.
I began by creating my canvas to work on. I do this by opening Adobe Photoshop. On top of the menu bar, you can see File, I click on it, then I click New. A new document windows box appeared. For this film campaign, I want my poster to be portrait and size as a A3. On the windows box, at the top, I click on Print, then I scroll and click at A3. Then, I click on Create and my canvas is prepared for editing.

Then, I go to Unsplash to get some good background that related to my title which is Neon Cyberpunk. I have initial ideas to make this design based on Tokyo. After found a suitable background, I go to Photoshop, click on File on top of the menu bar, I click Open, and a windows box pop up. I go to my background picture location and click on Open. Now my image is in my Photoshop but in different canvas. To relocated the image to my main canvas, on top of the bar menu, I click on Select and All. Then Edit and Copy. Back to my main canvas, I click on Edit and Paste. In this case, my picture is to big. So, I make sure that on top menu bar, my Show Transform Controls and tick so I can resize my picture to appropriate size.

Now I want to add subject into my canvas. I have found my subject on another images but the jacket that he wear is yellow which is not really suitable and not good looking. To change the jacket colour, on my subject layer, I slide to right corner, and click on Create new fill or adjustment layer, then click on Hue/Saturation. Then I make sure to to edit the colour just under the layer. I don't want it to affect other layer. I slide to the right menu bar, and click on This adjustment clips to the layer below. Now any change will only effect my selected layer. Now, to change the jacket colour, on the right bar menu, I go to Click and drag in image to modify Saturation. This will enable me to change the specific colour on my layer based on the eyedrop that I choose. For this one, I slilde to the canvas, and the eyedropper is automatically equipped, and I click on the yellow colour jacket. Now, in my right bar menu, I can change the Hue, Saturation and Lightness to the appropriate colour. In this case, I want to change the jacket colour the purple colour. After, I satisfy with the jacket colour, I crop the subject using Quick Selection Tool. The selection is not perfect, so I refine it using Lasso Tool. I make sure to change the Lasso Tool to Subtract from selection to delete unnecessary selected pixel. After I complete select the subject carefully, I right click in the selection, and click on Layer via Copy. Now I have my distinguish subject in the new layer. To move it to my main canvas, I slide to my subject layer, and I right click on it, and click on Duplicate Layer. A new Duplicate Layer box pop up, I make sure that the Document section is selected on my main canvas. Then I click on OK. Now the subject is on my main canvas.


Now I want to add my Title. First, I create a new layer by click on Layers plus button on the bottom right bar menu. This is so my font will not mix up with others subject. Now, I click on Horizontal Type Tool and click on the canvas. Then, I type "NEON CYBERPUNK", then I click on Move Tool to arrange it to the middle and appropriate place. Then, I change the format of the text on the top bar menu. I use OCR A Extended font, Regular, with the size of 90. I want to add a neon effects on this title so it look more interesting and related to the neon light. To do that, on the layers page, I right click on my Text layers. Then, a menu pop up. I click on Blending Options. I want to make it just outline, so, on the Blending Options, Advanced Blending, I turn down the Fill Opacity to 0%. Now, there is no fill in my text. To make a outline or Stroke, on Blending Options, I click on the box to check the Stroke options and click on it to open the menu. On Stroke, Structure, I change the Size to 1px, the Position I change to Outside, Blend Mode I keep it Normal and Opacity I keep it 100%. Under the Structure menu, got Fill Type, I choose Color, and under it got colour box to change the colour and I click it. A Color Picker (Stroke Color) pop up. I change the color code to #0600ff. Next, on Blending Options, I check the Inner Glow box and click on it to open the menu. On Structure menu, Blend Mode I change to Linear Dodge (Add) with 80% Opacity and 0% noise. To change the colour, I click on the colour box and Color Picker (Inner Glow Color) box pop up. I change the colour code to #00c6ff. On Elements menu, I keep the everything the same just the Size I change it to 20px. Then, on the Blending Options again, I check the Outer Glow box and click on it to open the menu. On Outer Glow menu, Structure, I change the Blend Mode to Hard Light with Opacity 95% and 0% Noise. I change the colour by clicking on the colour box and the Color Picker (Outer Glow Color) box pop up. I change the colour code to #9c00ff. After change all of that, I click on OK.

Now I just need to add some information details about this campaign like, main cast, release date, credits and logo of them. To do that, first I want to put a text over my title stating that this film directed by Christopher Nolan. I click on Text Tool and type the role and the name. I use Agency FB Regular for the font, however, the role I set the text size to 18pt and the name to 30pt. This will the same as the credits too . Then, I use Move Tool to move it above my title and arrange it in the middle. Next, I do the same for the credits but put it under the title. I also find a logo of studio credits right here and I download it and put it in my canvas under the credits. After that, on top of the film campaign, I put the main cast and the date as the attractions. I again click on Text Tool and type the main cast with the font of Agency FB Regular with 31 pt. I do this three times. Last but not least, I want to put the date. I click on Text Tool with the same format but I want to change the set tracking. I do that by clicking on the date layer, than on the right Properties menu, I change the Set Tracking For Selected Characters to 480.
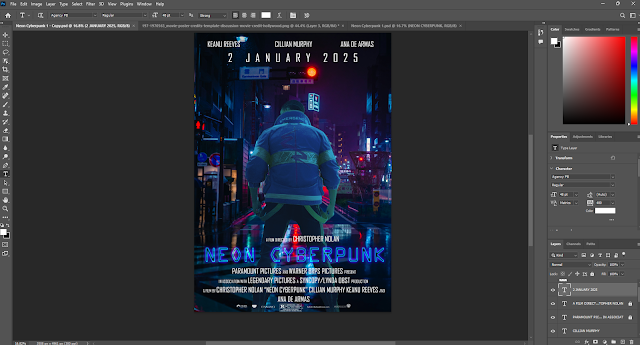


After finish that, I want to save it. I slide to File, Export and Export As. New Export As windows box pop up. On this windows box, on the File Settings, I change the Format to JPG and set the Quality to 7 which is High. I want my film campaign to be high quality. Then I click on Export button and save it to my Desktop. This is my first design:


Then, I insert the background. The background was too bright so I edit it by clicking on the background layer, then I click on Create New Fill or Adjustment Later, Brightness/Contrast. Then, on the layers page, I make sure that I enable This adjustment clips to the layer so it would not effects other layer and I click on the Brightness/Contrast icon. I set the Brightness to -90 and 100 Contrast. Then I group the Brightness/Contrast layer and background layer.

Now, I want to add the subject which is Keanu Reeves. For this subject, I randomly took a picture of a hoodie and a picture of Keanu Reeves and edit crop it so it look like my subject wearing hoodie. I crop a picture of Keanu Reeves and using Lasso Tool to select the face roughly. Then I use Layers Mask and right click on the Layer Mask and click on Select and Mask. A new tool and pop up and I use the Refine Edge Brush Tool in Add to selection mode. I brush it around the edges so it selected neatly. Now I have my subject in a hoodie but the colour seems off. So I edit by clicking on the subject layer, I click on Create New Fill or Adjustment Layer and click on Curves. The process is the same as above I experiment it so it look good. Then, after having good subject I save it as PNG and open it on my main canvas. I want to add a hologram effects to this subject. I do that by, make a new layer behind the subject, then Edit, Fill it to White. Then I go to Filter, Filter Gallery, a new windows bob pop up. I go to Sketch folder and Halftone Patterns. I change the Size to 3 with 50 Contrast and Dot Pattern Type. Then I click OK. After that, I hide my subject first by clicking on Eye Icon or Toggles layers visibility on the left layers, I go to Channel page, then I hold my CTRL button, I click on the Red thumbnail layer to make a selection. Then, I come back to my layers page and make a Layer masks with Soft Light blend mode. Then I duplicate that layer and put in over my subject. Then, I hold CTRL and clicking on my subject thumbnail to make a selection. I go to Lasso Tool and right click, then Select Inverse. Then I press Delete button on my keyboard to remove the unnecessary selection for the background. Now I have a dot kind of hologram subject. Then, I want to add colour to my subject so it look glowing. To do that, I go to Blending Options, and check on Inner Glow, Color Overlay and Outer Glow. I set the Inner Glow Blend mode to Screen, Opacity of 90% and a colour of my selection. Color Overlay, I set the Blend Mode to Overlay, Opacity of 50% and colour of my selection. Outer Glow, I set the Blend Mode to Screen, Opacity of 50%, Noise of 40% and colour of my selection. The Elements, Spread I set it to 5% and 80px size. Then I click on OK. I also add a little particle effects by make a new layers with Layer masks above my subject. I use Brush Tool with my colour selection with Kyle's Spatter Brushes. Then I tap around my subject and I try to make it subtle. Then, I want to add a subtle hologram line by using hard brush and make thin. Then, I click and hold SHIFT button to make a straight line.

After that, I want to add a katana behind my subject. I do that by downloading one of the katana image. The katana was single so I duplicate the layers and mirror it by Transform and Flip Horizontal and Vertical so it look mirrored. Then, The katana is vulnerable since the subject is transparent, on both of the katana layers, I make a Layers Masks, and use Black brushes to remove the unnecessary katana inside the subject.
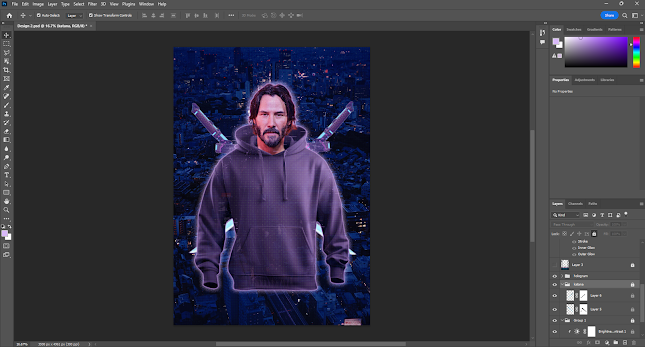

I also set a Curves so the image look more vibrant .Then, I put the details and information same just like how I did in my first process.

Next, I want to put a foreground like how I did in my sketch. I chose of the picture and crop it. Then I duplicate that layers to my main canvas.

I also set a Curves so the image look more vibrant .Then, I put the details and information same just like how I did in my first process.

Then I Export it as a JPG with high quality. This is my second design:

Very well done on this detailed and extensive process - excellent work
ReplyDelete