After done my advert plan and research, it is about time to create the final advert. I will use Pixlr E as we did in the last practice.
Like in our previous practice, I went to Google search engine and search for Pixlr. Then, for this edit, I use Pixlr E. Next, I click on Create New, a box appeared and I want to use A3 size by clicking on Print on top of the menu, click on A3. For the name of title, I put it as "Save The Purr" with white background. Slide to Create then click it. The default orientation are portrait, however I want to change to landscape for my advert. To do this, I clicked on Image, to Canvas Rotation, Rotate Left / ccw. The canvas now in landscape orientation.

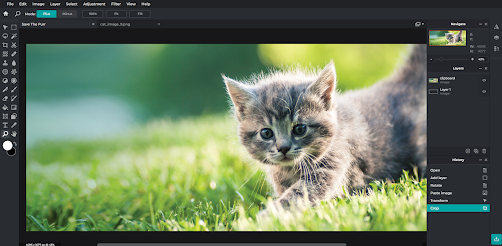
Now, I need to put my chosen image into the canvas. To do that, I slide to the top menu and clicked on File, Open Image. A window box pop up and I do to the directory of my image location. Then click on it and Open. The image will likely open in another canvas. To move it, on my chosen Image, I click on Select, Select All to select the image. Then slide into Edit and click on Copy. Back to our blank canvas, I clicked on Edit and Paste. The image will be on my canvas. In my case, my image is small. I use Arrange or Move Tool to resize my image vertically. There's a white bar at the bottom and top. I get rid of that by using Crop Tool and slide it to fit image. Now my canvas fit with my image.
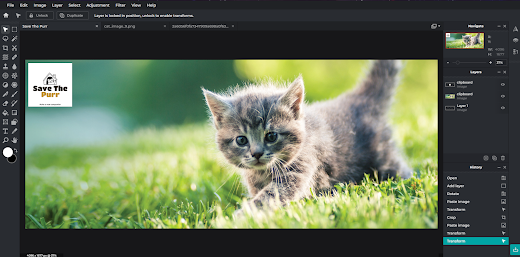
So far so good. I want to add a logo now. First step is, slide to File and Open Image. A window box pop up and again I went to the location of where I save my logo. I clicked on it and open. The image of the logo is on another canvas. To move it to my canvas, on my logo image canvas, I clicked on Select, Select All, then slide to Edit and Copy. After that, I went back to my main canvas, clicked on Edit and Paste. My logo are now in the middle of my canvas. I want to move it at the left top canvas. I slide to the left of the menu, slide to Arrange or Move Tool, slide my cursor at the logo, then move it at the left top canvas. I even change it to appropriate size.
Next I need to add a tagline and a contact info. Let's start with tagline. First of all, I add a new text layer by clicking at Text Tool and clicked on the canvas. A box will appear asking you to add a new layer and I clicked add. A text box will appear, I double click to change the text. I change it to " Feeling lonely? Purr is ready to be your companion". I use Chukies font because it really suitable with the theme. I change the size to 80, left aligned it. This is for conveyed the message to the viewer. After that I slide to Arrange or Move Tool to move it to the right of my logo.
I also need to provide my contact info, which is my social media and email address. For this, I going to provide a Facebook, Instagram and Email address. There is a specific reason why I chose Facebook because of my previous research. I get those logo by using Google search engine with PNG file so it does not have any background.
Onto the next step, after I download all those logo, I slide to File, Open Image and go to my download location and open it. Then, move to the top menu, clicked on Select, Select All and Edit then Copy. Go back to the main canvas and slide to Edit and Paste. I did this process for all those 3 logos. I use Arrange or Move Tool to move it under my logo. After putting those logos, I add 4 layers of text layer by clicking on Text Tool and click on the canvas. I repeat this process for 4 times. For the first text, I am going to change it to "Contact us!". For this text, I just Arial, size of 70 and I style it bold using the format menu at the top. I then use Arrange or Move Tool to place it to where I want to be which is right under the logo. Next, for the contact info text, first text I change to "@Save_The_Purr" for Instagram, second text,"@Savethepurr" as for Facebook and lastly "savethepurr@gmail.com" for my email address. The font I use is Gustavo and sizing it to 45. Then, I use Arrange or Move Tool to move it beside the logo. I repeat process 3 times.

After done everything, I slide to File, Export and Quick export image as PNG to save it. Windows box pop up and I chose desktop as my location so I can easily have access to it.

Like in our previous practice, I went to Google search engine and search for Pixlr. Then, for this edit, I use Pixlr E. Next, I click on Create New, a box appeared and I want to use A3 size by clicking on Print on top of the menu, click on A3. For the name of title, I put it as "Save The Purr" with white background. Slide to Create then click it. The default orientation are portrait, however I want to change to landscape for my advert. To do this, I clicked on Image, to Canvas Rotation, Rotate Left / ccw. The canvas now in landscape orientation.

Now, I need to put my chosen image into the canvas. To do that, I slide to the top menu and clicked on File, Open Image. A window box pop up and I do to the directory of my image location. Then click on it and Open. The image will likely open in another canvas. To move it, on my chosen Image, I click on Select, Select All to select the image. Then slide into Edit and click on Copy. Back to our blank canvas, I clicked on Edit and Paste. The image will be on my canvas. In my case, my image is small. I use Arrange or Move Tool to resize my image vertically. There's a white bar at the bottom and top. I get rid of that by using Crop Tool and slide it to fit image. Now my canvas fit with my image.

So far so good. I want to add a logo now. First step is, slide to File and Open Image. A window box pop up and again I went to the location of where I save my logo. I clicked on it and open. The image of the logo is on another canvas. To move it to my canvas, on my logo image canvas, I clicked on Select, Select All, then slide to Edit and Copy. After that, I went back to my main canvas, clicked on Edit and Paste. My logo are now in the middle of my canvas. I want to move it at the left top canvas. I slide to the left of the menu, slide to Arrange or Move Tool, slide my cursor at the logo, then move it at the left top canvas. I even change it to appropriate size.

Next I need to add a tagline and a contact info. Let's start with tagline. First of all, I add a new text layer by clicking at Text Tool and clicked on the canvas. A box will appear asking you to add a new layer and I clicked add. A text box will appear, I double click to change the text. I change it to " Feeling lonely? Purr is ready to be your companion". I use Chukies font because it really suitable with the theme. I change the size to 80, left aligned it. This is for conveyed the message to the viewer. After that I slide to Arrange or Move Tool to move it to the right of my logo.
I also need to provide my contact info, which is my social media and email address. For this, I going to provide a Facebook, Instagram and Email address. There is a specific reason why I chose Facebook because of my previous research. I get those logo by using Google search engine with PNG file so it does not have any background.
Onto the next step, after I download all those logo, I slide to File, Open Image and go to my download location and open it. Then, move to the top menu, clicked on Select, Select All and Edit then Copy. Go back to the main canvas and slide to Edit and Paste. I did this process for all those 3 logos. I use Arrange or Move Tool to move it under my logo. After putting those logos, I add 4 layers of text layer by clicking on Text Tool and click on the canvas. I repeat this process for 4 times. For the first text, I am going to change it to "Contact us!". For this text, I just Arial, size of 70 and I style it bold using the format menu at the top. I then use Arrange or Move Tool to place it to where I want to be which is right under the logo. Next, for the contact info text, first text I change to "@Save_The_Purr" for Instagram, second text,"@Savethepurr" as for Facebook and lastly "savethepurr@gmail.com" for my email address. The font I use is Gustavo and sizing it to 45. Then, I use Arrange or Move Tool to move it beside the logo. I repeat process 3 times.

After done everything, I slide to File, Export and Quick export image as PNG to save it. Windows box pop up and I chose desktop as my location so I can easily have access to it.
Here is my final results of my advert:

Reflection:
As a graphic designer enthusiast, I find making an advert is really inspiring my encouragement. I found peace in doing this kind of advert. I think this advert is straight forward enough. However, my eyes are itching seeing those blank space at the left of the cat. I haven't got enough ideas to put because this advert is for advertising an adoption. Besides that matter, I think my advert are complete. Let's set a short scenario. If a person saw this, the cat is obvious to the eyes. They will read the tagline and for those who want to adopt the kitten or cat, they can contact by the contact info under the logo. Not going to lie, this advert is too simple. If I would have enough information, I would add in this advert. Put that asides, I still think this advert are complete. I hope people find this advert intriguing and interesting. As a first time designing an advert, I am proud of myself on this one. I consider it as good achievement for me as my initial of my graphic design voyage.
As a graphic designer enthusiast, I find making an advert is really inspiring my encouragement. I found peace in doing this kind of advert. I think this advert is straight forward enough. However, my eyes are itching seeing those blank space at the left of the cat. I haven't got enough ideas to put because this advert is for advertising an adoption. Besides that matter, I think my advert are complete. Let's set a short scenario. If a person saw this, the cat is obvious to the eyes. They will read the tagline and for those who want to adopt the kitten or cat, they can contact by the contact info under the logo. Not going to lie, this advert is too simple. If I would have enough information, I would add in this advert. Put that asides, I still think this advert are complete. I hope people find this advert intriguing and interesting. As a first time designing an advert, I am proud of myself on this one. I consider it as good achievement for me as my initial of my graphic design voyage.
Comments
Post a Comment